Arthur Shield Quickstart
Building an LLM Application with Arthur Shield
Integrate your first application with Arthur Shield
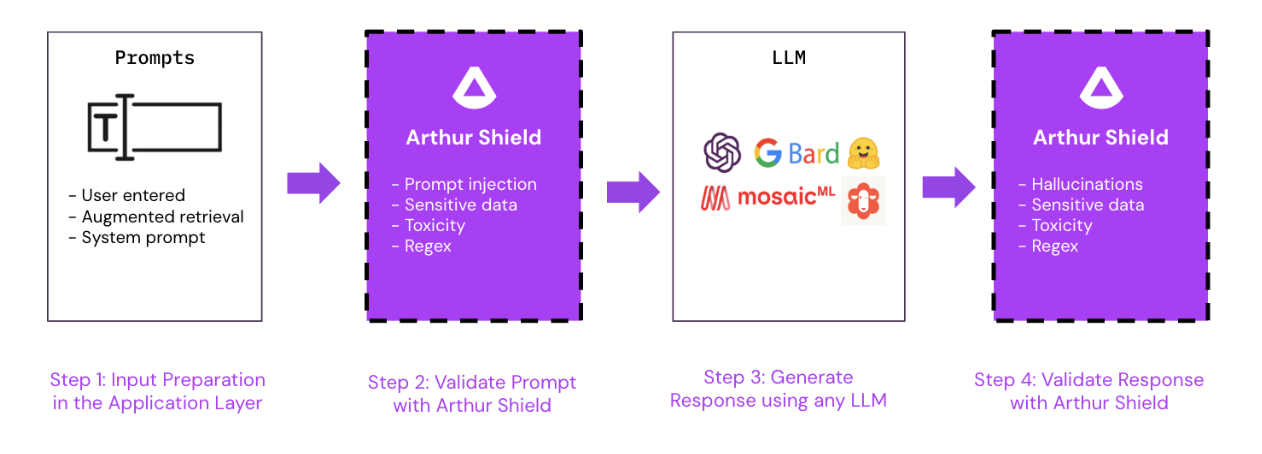
With an easy API-first design, teams can integrate Arthur Shield into their application within minutes. The Arthur Shield APIs can be called by your application before and after routing to a public or self-hosted LLM endpoint. The easiest way to think about using Shield is that it breaks your LLM application down into a simple four-step process:

Prerequisites
Get Access to Arthur Shield
In order to get started with Arthur Shield, confirm that you have an instance of Shield running at a hostname that your application can reach. You can take a look at the Deployment Guide to understand the different deployment options available for hosting Shield. You will also need to include your access token in each API request, please see the Authentication Guide for more information on how to do this.
Configure default rules to be applied to all Tasks
Arthur Shield is deployed with no rules enabled, teams receive value from deciding which rules to enable and customizing those rules for their organization and specific use cases.
Default Rules exist globally within an instance of Arthur Shield and are applied universally across existing Tasks and any subsequently created new Tasks. We recommend creating some default rules to get started. Please reference the Rule Configuration Guide for more information on how to create default rules.
Step 0: Create a Task in Arthur Shield
Once you have validated that you have access, you will need to create a Task in Arthur Shield. You can think of a Task as a conceptual use case under which you can group and manage a set of Shield rules.
{
  "name": "Example Task Name"
}
Hold on to the id returned in the ResponseBody by this endpoint, it will be necessary for the upcoming steps.
Task Rules only apply to a single Task. When you Create a Task, all existing default rules will be auto-applied for this new Task. You can see which rules have been auto-applied in the rules ResponseBody field when you create a task.
{
  "id": "f29c9876-4528-425e-934d-eca2c9633a18",
  "name": "Example Task Name",
  "created_at": "2023-08-24T14:15:22Z",
  "updated_at": "2023-08-24T14:15:22Z",
  "rules": [
    {
      "id": "4c547448-5edc-4f9d-80e7-1c1ed5e8eed5",
      "name": "keyword123",
      "type": "KeywordRule",
      "apply_to_prompt": true,
      "apply_to_response": true,
      "enabled": true,
      "scope": "default",
      "created_at": 1709316477693,
      "updated_at": 1709316477693,
      "config": {
        "keywords": [
          "key_word_1",
          "key_word_2"
        ]
      }
    }
  ]
}
Once a Task is created, you can create a rule to be applied only to this Task. You can also enable or disable any rule for a given Task as needed. Please the reference the Rule Configuration Guide for more information.
Step 1: Prepare Prompt
The first step in your LLM application’s workflow is to prepare the prompt that will be sent to the LLM. A prompt refers to the input to the model. Well-constructed prompts are the key to unlocking value from LLMs. For more information on how to evaluate various prompts for a given use case, check out Arthur Bench.
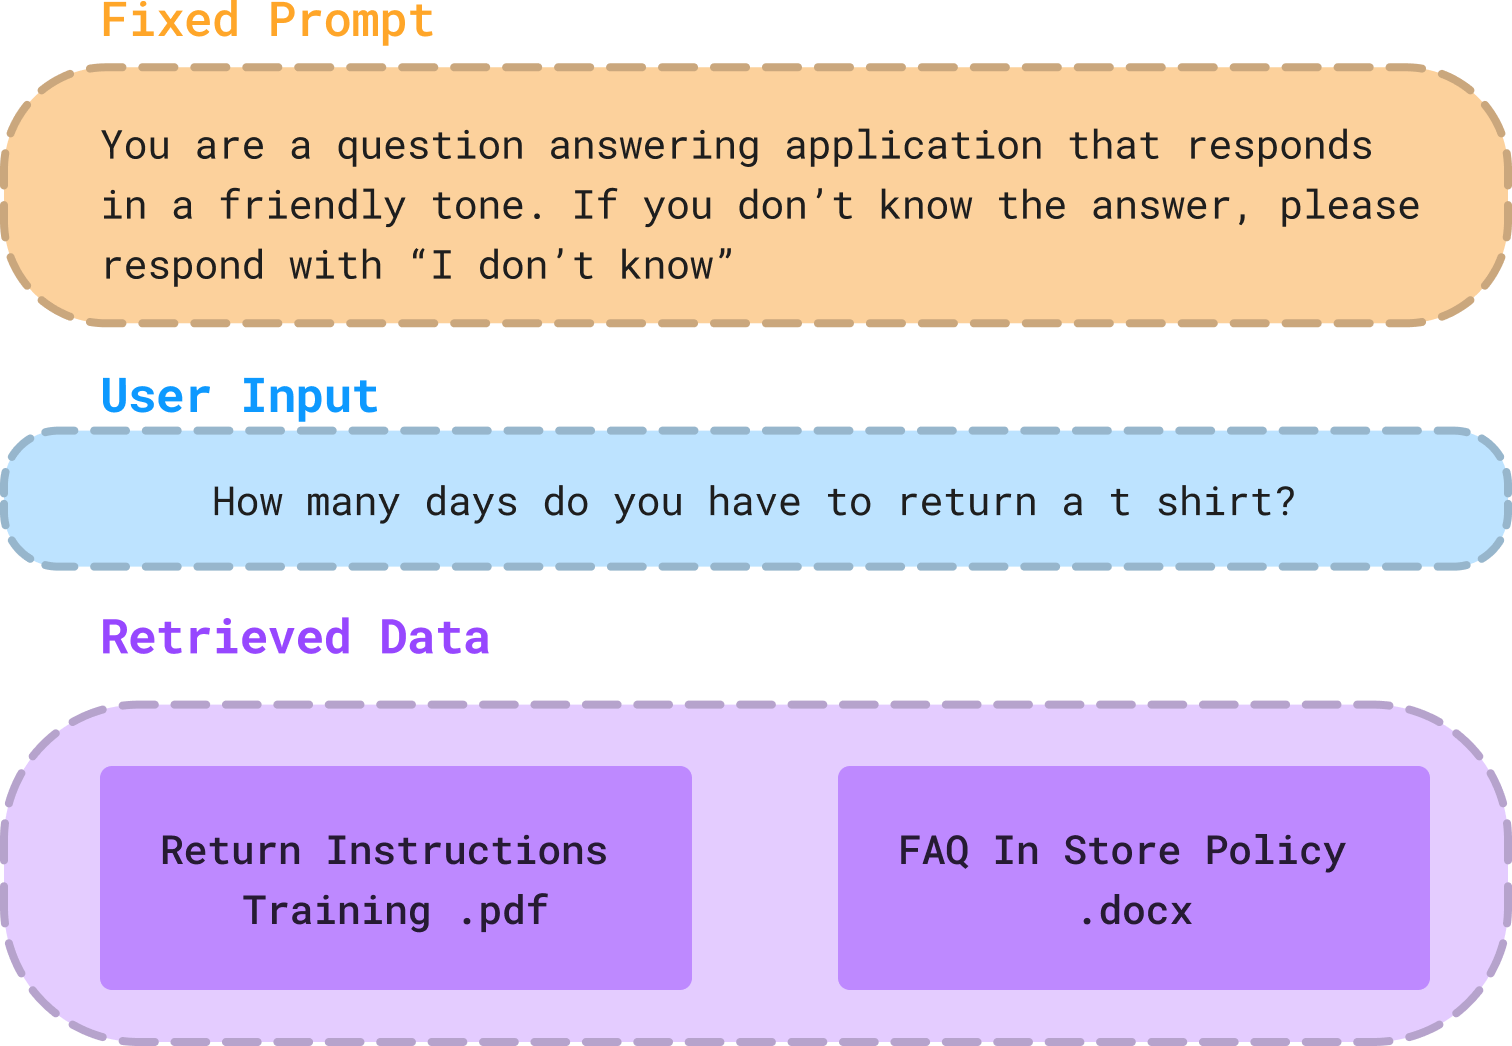
Usually, a prompt is constructed of the following conceptual components:
-
Fixed Prompt: This piece of the prompt is the same for every call to an LLM from an application. This is where the application can append guidelines on how the model should approach the given prompt and perform according to expectations.
-
Dynamically Added Text: The variable part of each individual prompt. This consists of:
- User Input: In a chat application, this is the text inputted by the end-user in the chat window. In other LLM-based applications, this is the unique input text into the LLM agent at inference time.
- Retrieved Data: Relevant information that the model should use to help complete the given task. Oftentimes, this information is relevant parts of documents extracted from a data store using some sort of intelligent data retrieval logic.

Step 2: Validate Prompt with Arthur Shield
Before the prompt is sent to the LLM, we want to validate that it is safe to do so using Arthur Shield. This can be achieved by calling the validate_prompt endpoint.
POST {hostname}/api/v2/task/{task_id}/validate_prompt
Note: the task_id is from the Task you created in Step 0.
{
  "prompt": "How many days do you have to return a t shirt?"
}
The validate_prompt endpoint requires you to include only 1 field:
- prompt: Users can choose which components of the prompt constructed in Step 1 they want to include in this field to be validated. We recommend only passing the User Input to optimize validating the dynamically added text that could be a risk. This reduces the noise going into Arthur Shield and allows the rules to optimize checking for potential malicious user inputs.
Typically, Arthur Shield will validate the prompt using a set of configured rules for:
- Malicious user input or Prompt Injection
- PII or Sensitive Data leakage
- Forbidden words, topics, or phrases
- Toxicity
For more information on how Arthur defines and detects each of these, please see our Rules Overview Guide. Depending on the rules configured for this task, this endpoint will return the result of each configured rule run on the provided prompt in the rule_results field.
{
  "inference_id": "4dd1fae1-34b9-4aec-8abe-fe7bf12af31d",
  "rule_results": [
    {
      "id": "e5ee86e1-8369-4eca-83bd-577668fc3208",
      "name": "keyword123",
      "rule_type": "KeywordRule",
      "scope": "default",
      "result": "Pass",
      "details": {
        "message": "No keywords found in text.",
        "claims": [],
        "pii_results": [],
        "pii_entities": [],
        "keyword_matches": []
      }
    },
    {
      "id": "cd1f8027-cdfb-4a2d-9ec2-e483f9259746",
      "name": "regex123",
      "rule_type": "RegexRule",
      "scope": "default",
      "result": "Pass",
      "details": {
        "message": "No regex match in text.",
        "claims": [],
        "pii_results": [],
        "pii_entities": [],
        "regex_matches": []
      }
    }
  ]
}
To Block/Affect End User Experience, You Need to Provide Logic Within Your ApplicationArthur Shield does not automatically block or interact with the end user experience by default. In your coded application, you must parse the results and decide whether to proceed with sending the prompt to the LLM or to take some other course of action. Depending on the use case and rule flagged, teams may choose to stop the LLM application calls and return a default message to the user or allow the user to continue and just monitor the suspicious activity.
Step 3: Generate a Response using an LLM
Once you have validated using Arthur Shield that the prompt is safe - you can proceed with formatting and sending the prompt to your chosen LLM. For more information on how to evaluate the effectiveness of different LLMs for your given use case, check out Arthur Bench.
Step 4: Validate Response with Arthur Shield
Once you have received a generated response from the LLM, you can validate that the response is safe to return to the end user using Arthur Shield. This can be achieved by calling the validate_response endpoint.
POST {hostname}/api/v2/tasks/{task_id}/validate_response/{inference_id}
Note: the task_id is from the Task you created in Step 0 and the inference_id is from the validate_prompt endpoint's ResponseBody in Step 2.
{
  "response": "Yes, you can return all unworn clothing items within 30 days for a full refund.",
  "context": "<Excerpts from the Return Instructions Training PDF>"
}
The validate_response endpoint requires you to include 2 pieces of information:
- response (required): This is the LLM's generated response obtained in Step 3.
- context (optional): The augmented data retrieved during Step 1. While optional, this context field is required for detecting Hallucinations. So, it is often best practice to include this information when available.
Typically, Arthur Shield will validate the response using a set of configured rules for:
- Hallucination
- PII or Sensitive Data leakage
- Forbidden words, topics, or phrases
- Toxicity
For more information on how Arthur defines and detects each of these, please see our Rules Overview Guide. Depending on the rules configured for this task, this endpoint will return the result of each configured rule run on the provided response in the rule_results field.
{
  "inference_id": "4dd1fae1-34b9-4aec-8abe-fe7bf12af31d",
  "rule_results": [
    {
      "id": "94ebc731-1e50-4bf7-a7ba-9bfd645d0323",
      "name": "toxicity",
      "rule_type": "ToxicityRule",
      "scope": "default",
      "result": "Pass",
      "details": {
        "message": "No toxicity detected.",
        "claims": [],
        "pii_results": [],
        "pii_entities": [],
        "toxicity_score": 0.00017019308870658278,
        "keyword_matches": []
      }
    },
    {
      "id": "22af5293-b2fd-4dad-a418-47ce2c9b729a",
      "name": "hallucination",
      "rule_type": "ModelHallucinationRuleV2",
      "scope": "default",
      "result": "Pass",
      "details": {
        "score": true,
        "message": "All claims were valid!",
        "claims": [
          {
            "claim": "Yes, you can return all unworn clothing items within 30 days for a full refund.",
            "valid": true,
            "reason": "No hallucination detected!"
          }
        ],
        "pii_results": [],
        "pii_entities": [],
        "keyword_matches": []
      }
    }
  ]
}
You Need to Provide Logic Within Your ApplicationExactly the same as validating prompts with Arthur Shield, validating responses will not automatically block or affect end user experience. In your coded application, you must parse the results and decide whether to proceed with returning the response to the end user or to take some other course of action. Depending on the use case and rule flagged, teams may choose to block the response or just log a warning to the user.
Interested in managing multiple applications with Arthur Shield?
Check out this guide!
Updated 3 months ago
